Powerful Black and White conversion workflow in Long Exposure Photography
Black and White conversion workflow
Today again we will show a simple but powerful Black and White conversion procedure. Again, this is not a conversion with one mouse click but judge for yourself whether the result is worth it. I also recommend you to read the article: “From color to black and white using levels in Photoshop”.
Below you can see a photograph, how it came directly from the camera without any intervention and then its final form. I remind again that in adjustments are almost infinite possibilities so you can but do not have to get affected by my vision about the final photograph.

Before I start with adjustments I always leave the photograph chew over and wonder which way to go. Each photograph is divided into several parts with which I will work later.
In this case, it is the water, the sky and the pillars at the front and rear pillars. I will focus on each of these areas separately. Using the program from Nik Software Silver Efex Pro2 I created a color photography of the following versions: Overexposed, Neutral and Full Dynamic. Nik Software is a very powerful tool for conversion to black and white. Almost always I use three or more versions which I simply choose from the default presets. Then each of the versions is fine-tuned easily or I use them as they are. For beginners, I recommend to use only the default.
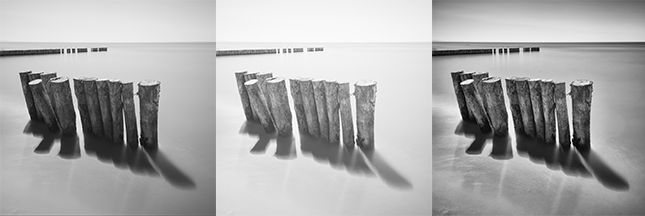
Neutral Version / Overexposed Version / Full Dynamic Version
Selections are the key in Black and White conversion
As I have already mentioned above, now is the time to do a selection of water and pillars. In this case, I will have three selections, pillars which are in the foreground, rear pillars and the rest of the photograph. Do selections precisely, this is probably the most time-consuming part of the photo adjustments. How to do selections read in my article “Selections in Photoshop, how to use them in Black and White photography”.
Workflow
My goal is to darken the rear pillars as much as possible but not so much that their drawing disappear. Water and sky I will try to adjust to high key effect, thus the brightest as possible. However, if the water would be only one bright area, the photograph would pose very flat so then I also add gray tint to the water. The last Full Dynamic Version will be used for adjustment of the pillars at the forefront.
Step 1: Adjustment of rear pillars
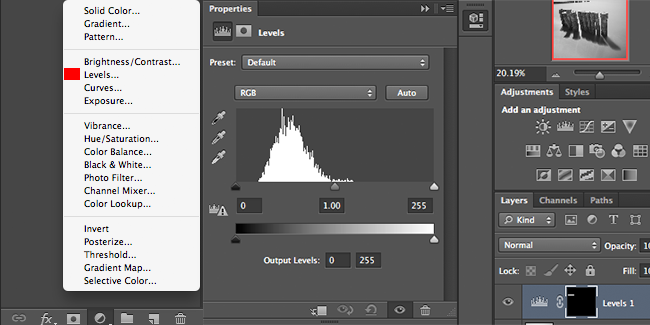
Now I induce already saved selection of rear pillars in Photoshop through Select – Load Selection. When I will have the selection of pillars indicated, I click on “Create a new fill or adjustment layer” under layers, click on “Levels”. In that way, I will adjust levels only in designated part of the photograph.
Before
After
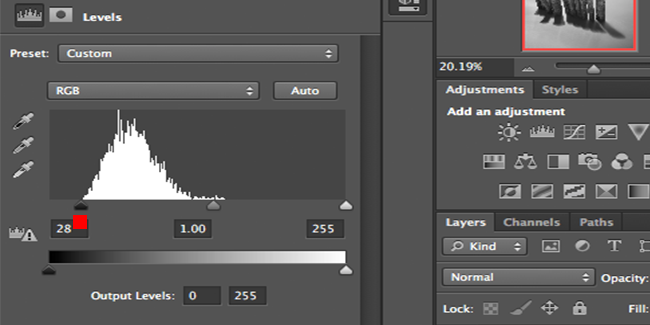
Using the levels you adjust the light and dark parts of photograph and midtones. Thus let´s watch the histogram. We can see that this part contains mainly midtones. Let´s try to shift the left slider, which relates to the dark parts, to the right until the top of histogram. We get a rich dark blacks but with a drawing and we have not damaged the photograph!

Then by right click on “adjustment layer” select “Merge Down”.
Step 2: Adjustment of water and sky
Intention is to have a gray sky while the water with the hey key effect. Therefore I combine Overexposed Version with Neutral Version. As yet ignore other parts of the photograph. Layer with Overexposed Version is placed above a layer with Neutral Version. So when I am already on Overexposed Version, I click on “Add layer mask”.
On the left panel click on “Gradient Tool” and choose the first option “Linear Gradient Tool”. Click somewhere in the upper pillars and drag the mouse just above the horizon. Observe that we have a very fine passing from Overexposed Version to Neutral Version. Transition looks very naturally.

As a last in this step right-click on “Apply layer mask”.
Step 3: The combination of individual selections into one photograph
So after the combination of water, dark rear pillars and front pillars from version Full Dynamic we get the following result.

For someone, the final version, but not for me. Photo lacks depth, thus I add gray to water in the bottom and fine-tune transition of the pillars jutting out of the water to be as natural as possible.
Finally I gently sharpen the photograph and it is finished.

Conclusion
Play and try. Not everything needs to be done in a single day, leave adjustment to chew over for several days and then return to it again. Thus you will achieve a better result. If you liked this Black and White conversion tutorial, subscribe to newsletter and you will receive all the news.
Thanks, Matej! Shooting RAW is a real time saver when trying to make selections. A lot of people don’t realize that they can use the large adjustment latitude in a RAW file to create easier selection areas on a properly exposed image.
That’s true Lorrin! Shooting RAW is a must, I totally agree with you.
Thanks for the good writeup. It in truth was a leisure
account it. Look complex to more introduced agreeable from you!
However, how could we communicate?
Thanks a lot for this great tutorial Matej. I will try this one at the weekend 🙂
Hi, I must say that you take amazing pictures and your how to work flows has been very helpful and the information you provide has been a great help for my future projects I am working on. I was wondering, are you planning to bring your work out in book form or ebook for the kindle and a help guide for new photographers interested in long exposures, but who do not have the know how. If you where, I would be your first customer. Keep up the good work.