Black and White conversion using Silver Efex Pro2
Do your photographs seem to have little contrast, appear flat, your black is not black enough or, on the contrary: your white literally shines? I have prepared this tutorial for those of you photographers, who are interested in moving their conversions into black and white to a higher level. I accidentally found this program right at the beginning when I discovered my passion for black and white photography and I’ve been using it ever since and I won’t say a bad word about it. You can also find a plug in version for Photoshop, Lightroom or Aperture.
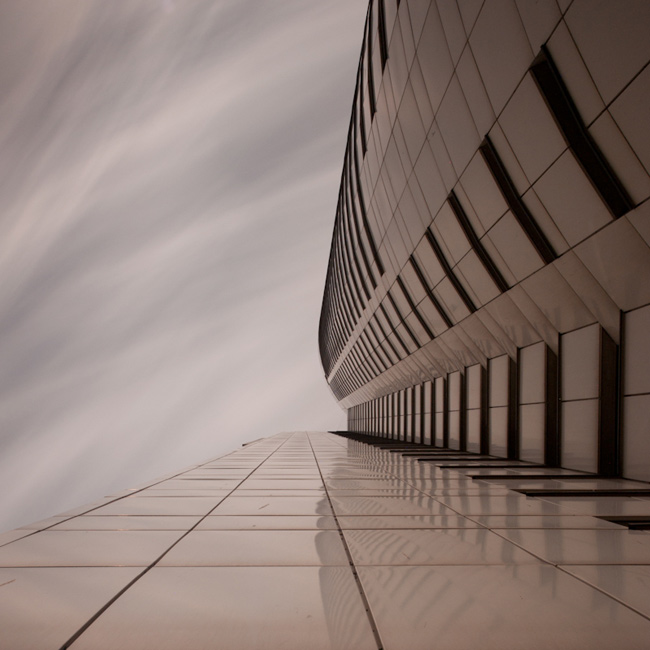
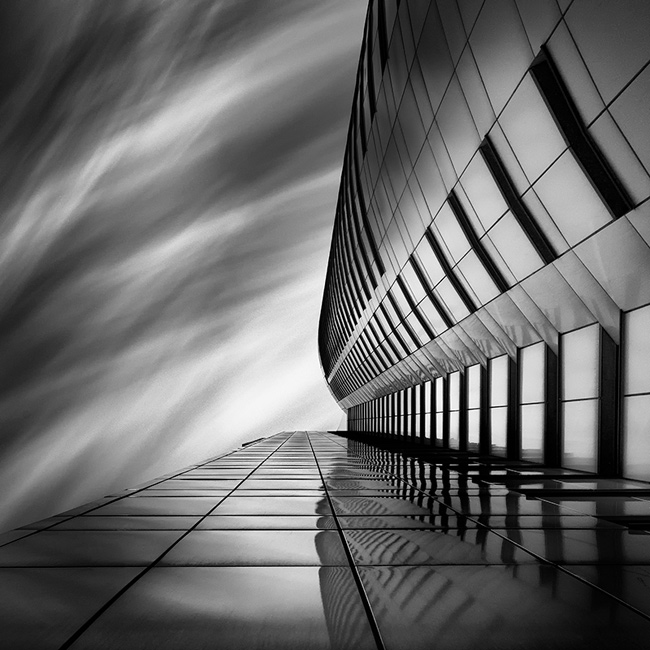
The desired result: before/after

Why Silver Efex Pro 2 from Nik Software?
Silver Efex is the world’s leading black and white software. It offers powerful set of darkroom-inspired features. Thanks to its set of features such as Dynamic Brightness, Fine Structure, Soft Contrast, Amplify Whites/Blacks or Grain Engine makes work with this program incredibly fast and effective. If you are not familiar with this program, don’t hesitate to test it by downloading the 15- day Free Trial.
I have described the basic adjustments used for conversion from color to black and white in my previous article. We’ve already done the first inevitable adjustments of the photography in its color version and we’ve exported it into the TIFF format with 300 pixels per inch.
Now we can move on to converting from color into Black and White using Silver Efex Pro2
Once opened the photo in Lightroom, click on the right mouse button and choose “Edit In” and then click on “Edit in Silver Efex Pro 2”. A table with editing options opens where you can adjust the original photograph or the one that has already been adjusted. I always choose the option “Edit a Copy with Lightroom Adjustments”. This is how you adjust the version of the photograph with all the adjustments you’ve made before in Lightroom.
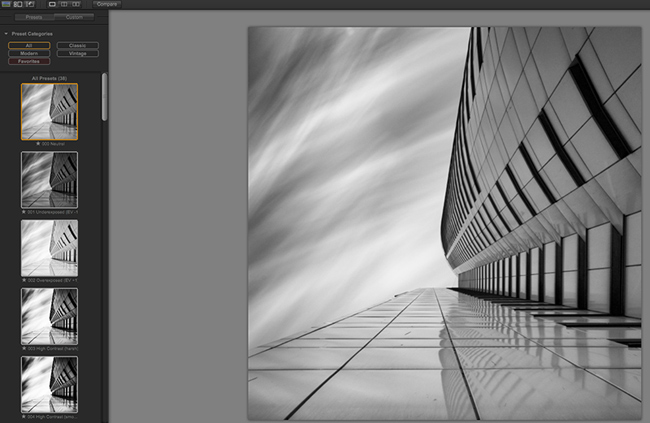
The photograph is converted into a neutral version immediately after opening the program. We have to continue working with this neutral version, since this result is not satisfactory and I need to get as maximum out of the conversion.
Try to imagine the final result prior to the conversion itself
In the article about importance of patience in Black and White Photography we said how important it is to leave the photograph to settle it down a little in our head and then get a better idea about what we expect to achieve from the color into black and white conversion. In the program Silver Efex 2 you can find different pre-defined presets in the left corner of the panel. At first, I click these different options to see, how various settings work for particular parts of the photograph.
Does it seem too complicated to you? It is not.
Let’s start working with the sky. I truly managed to catch the move of the clouds in this photograph which is a 224 second exposure with the use of two B+W filters. It would be a shame to not to pay attention to the sky first and point out the dynamics of the photograph. So, I start clicking the presets and focusing only on the sky.
1 – Neutral
2 – High Contrast
3 – Underexposed
4 – Low Key 2
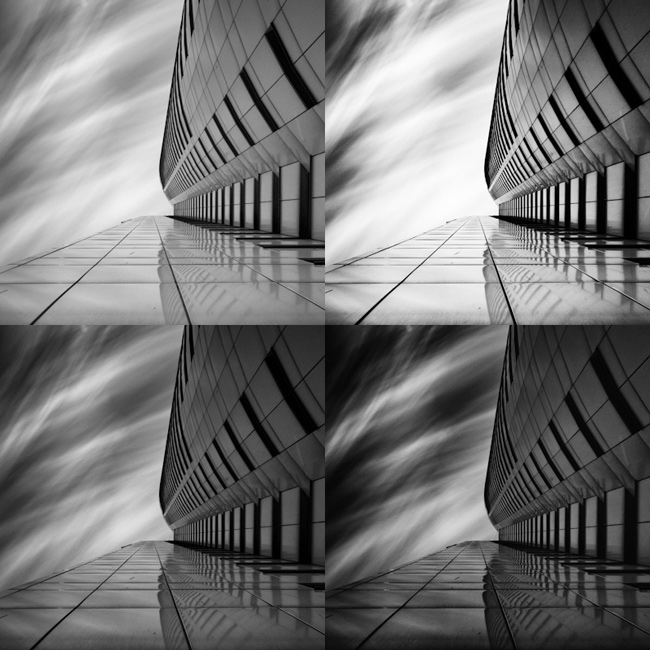
If you’re running out of inspiration, you can often easily find it with the first views. Which one do you like best? It depends on everyone’s consideration and taste.
I prefer Underexposed or Low Key 2. Although I like Underexposed better. But when I take a closer look at the rest of the photograph, the building itself is too dark.
Control Points in Silver Efex 2, unbelievable function!
In the further step I realized that I’d rather leave the sky the way it was in the Underexposed version of the photograph, but would like to keep the building in the Neutral version. It would not be problem for Photoshop, I would make two versions, where I would crop the sky from one and used it for the other photograph. Nevertheless, this would take some time.
And this is when the function Add Control Point comes to the scene. You can find it on the right side of the panel, click on the icon and move one Control Point to the area you would like to adjust in this case it’s the sky. Adapt the size of the diameter to the area of the sky. There are three other options for adopting the diameter size: Brightness, Contrast and Structure adjustment. Move the cursor here and there to see how the photograph is changing. I used the following values: Brightness -62%, Contrast +14% and Structure +14%. Be careful when using Structure, don’t add too much of it, otherwise some noise might appear on the photograph.
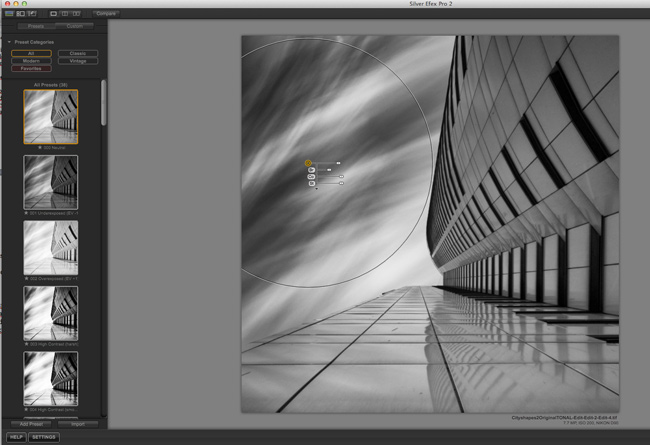
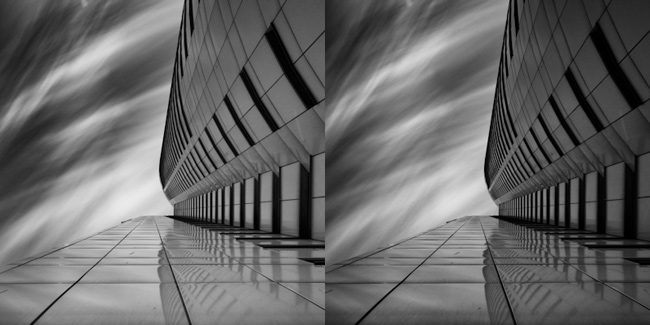
On the left, there is a photograph with the use of Control Point on the sky in its neutral version. On the right, we can see how the Underexposed version gave it a nice sky but the building itself stayed too dark to be able to continue working with it. All this can be done in just three seconds!
Using several Control Points at the time
My next aim with this photograph was to highlight the white from the area of those little squares which make such a nice symmetrical line towards the sky. I will show you another area of excellence of the program Nik Software Silver Efex Pro 2 and that is using several Control Points at the same time.
Let’s highlight the Control Point and reduce the diameter to the size of one little square. Later we can multiple this point by pressing the ALT button together with clicking on the left mouse button. If you’ve made some changes on the Control Point prior to the multiplying, e.g. Contrast or Exposure, this point will grow together with these settings. If you’d like to get another Control Point without any changes, you can click on it again in the right panel of the program.
In this step I’ve made 33 Control Points at the same time, as you can see on the list of different points on the right side of the panel, which are highlighted with yellow color.
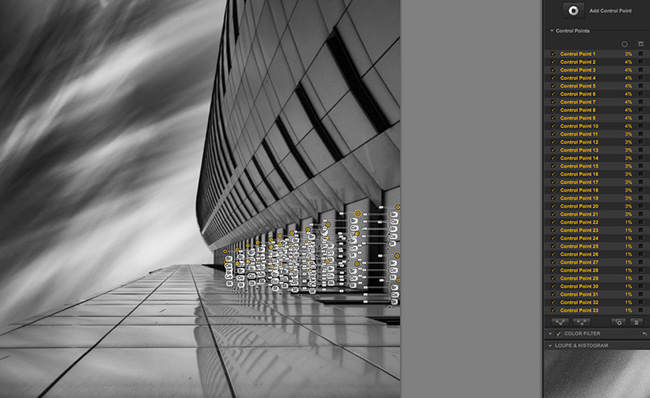
If you want to work with all the 33 points together, simply mark them all in yellow and then click on the icon “Group the selected control points” under the points.
The adjustment options of these points will disappear and you’ll be working with only one of them whilst the changes will be visible on the whole group. You can probably imagine how useful this function can be, if you want to make controlled adjustments of different parts of the photograph without having to use masks in Photoshop.
In this step, I’d like to light these parts up by using more Brightness to +60%. Can you see the difference? And again, the change is achieved within a few seconds.

Conclusion
The final result depends only on your prescience. You can mark again some new areas of the photograph, try different settings and experiment.
Finally, let’s look at the original photograph that came out directly from the camera and the final result. Do you like it?
dear sir ,
First of all i have to thank you for the amazing learning series you have put together. I just bought my lee filters and i wanted some tips on how to use them so browsed net and found your website.
The content in it is just awe inspiring ! the sea scapes and the architecture images have just inspired me ! i hope i too take such surreal images someday. thank you so very much
regards
Swapnil Deshpande
Hi Swapnil, I am glad you like it!
Thanks Matej! Your website is brilliant and utter inspiration for me. I cannot wait to start producing photography like this.
This how I have been approaching my post editing. You’ve added some real gems here in terms of tips and things to consider. Thank you so much!